Start with the giveaways, not the whole piece
Most budget furniture announces its price in a handful of spots. Once you know where to look, you can make cheap furniture look expensive by fixing those few tells instead of the entire piece. The eye reads the same four or five cues every time: shiny plastic hardware, a thin printed wood grain, stubby legs, and flat builder-grade lighting overhead.
Walk over to the piece and squint. The details that jump out first are the ones doing the most damage. A particleboard nightstand with a glossy stamped knob looks cheap because of that knob, not because of the box it sits on. Fix the loud parts and the rest fades into the background.
- Hardware: plastic or thin stamped pulls in a high-shine finish.
- Edges: visible seams where a printed laminate wraps a corner.
- Legs: short, chunky, or molded into the base.
- Sheen: a plasticky gloss that no real wood ever has.
You don't need to address all of these on every piece. Pick the two that bother you most and start there. That alone shifts how the whole thing reads.
It helps to think in terms of contrast. Expensive furniture tends to have a consistent story: matte finishes, real shadow under the body, hardware that matches the metal in your light fixtures. Cheap furniture is inconsistent. A warm wood grain printed on a piece with cold silver plastic pulls feels off even if you can't name why. Your job is to make the cues agree with each other. Once the metals, the sheen, and the proportions tell one coherent story, the price of the box underneath stops mattering.
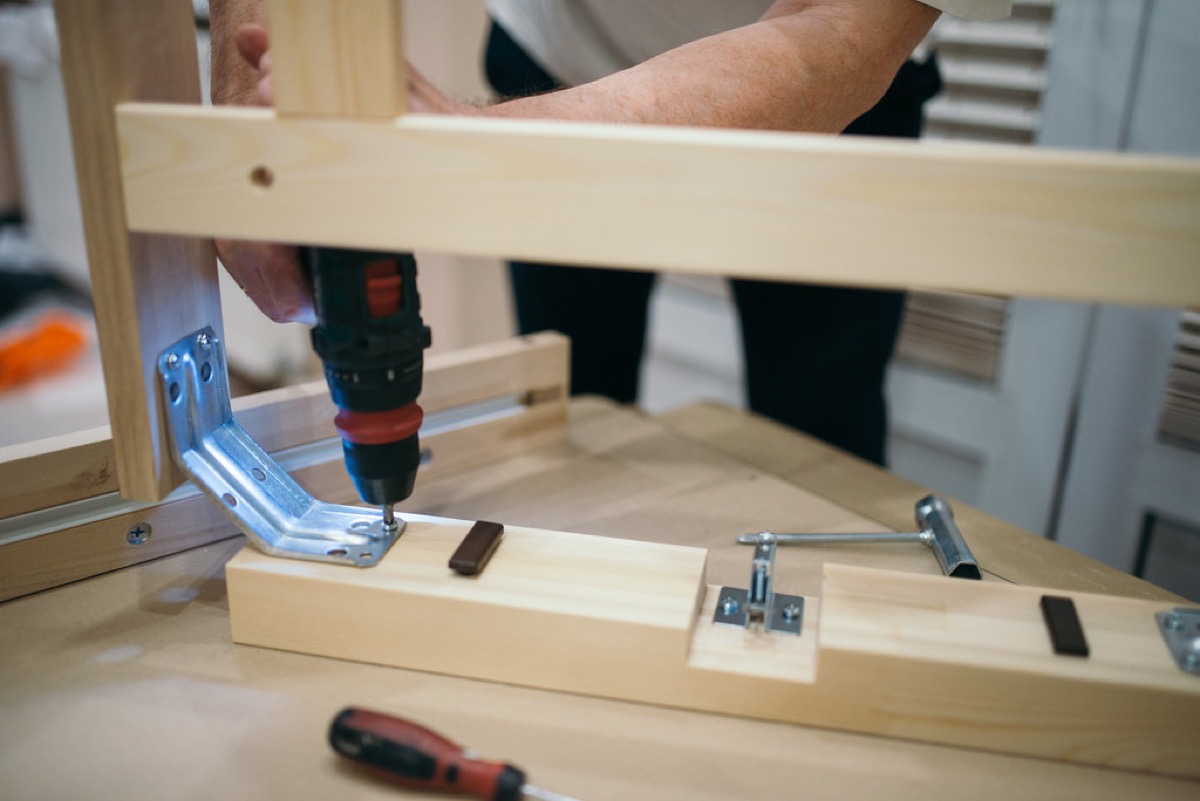
Swap the hardware before you do anything else
This is the cheapest, fastest upgrade in the whole list, and it punches way above its cost. A dresser with six new solid-brass or matte-black pulls looks like a different product than the one that shipped with plastic knobs. You can usually do a whole piece for $20 to $40.
Two things matter here. First, measure the hole spacing (the center-to-center distance between screws) before you buy, because pulls come in standard sizes and a mismatch means drilling new holes. Second, pick a finish with some weight to it. Solid metal feels cold and heavy in your hand; that heft is what your brain registers as quality.
If your piece has a single knob where you'd rather have a bar pull, you can fill the old hole with wood filler, sand it flat, and drill fresh. It's an hour of work that nobody will ever notice once the new hardware is on.
One trick that designers lean on: match the new hardware to the other metals already in the room. If your faucets and lamp bases are brushed nickel, brushed nickel pulls make the dresser feel like it belongs. If you mix a warm brass pull into a room full of cool chrome, the eye reads it as a mismatch, not a feature. Pick one metal and let it repeat. That repetition is a big part of what makes a styled room look intentional and expensive rather than thrown together.
Don't overlook the hinges and screws either. Old hinges that show their slotted heads or that have gone slightly rusty drag a piece down. New cabinet hinges run a couple of dollars, and swapping visible screws for ones that match your hardware finish is the kind of detail people feel without consciously noticing.
Nobody walks into a room and prices the particleboard; they read the hardware, the legs, and the light. Maya Ellison, Novalyfe
Paint and finish like you mean it
A bad paint job looks worse than the original finish, so this is where patience pays. The order goes: clean, sand, prime, paint, seal. Skip the sanding and primer and your color peels off the laminate in a year. Spend twenty minutes scuffing the surface with 220-grit paper and a coat of bonding primer, and it holds.
Color choice does a lot of the work. Deep, muted tones read as expensive: a charcoal, a forest green, a warm off-white. High-contrast brights tend to look cheaper, not richer. Use a small foam roller for flat panels and a quality brush for the edges, and lay on two thin coats instead of one thick one.
Watch what you're spraying indoors. Many paints and finishes release volatile organic compounds, which the EPA links to headaches and irritation at high indoor levels. Look for low-VOC or zero-VOC products, open the windows, and let things cure fully before the piece goes back in a bedroom. The label and the EPA Safer Choice mark tell you what you're breathing.
- For wood-tone pieces: a gel stain goes over old finishes without full stripping.
- For a matte modern look: chalk-style paint plus a wax or matte poly topcoat.
- Always seal: an unsealed painted tabletop scratches in weeks.
The finish itself sends a quality signal. Cheap furniture almost always has a plasticky high gloss, so a flat or eggshell sheen instantly distances your piece from the bargain-bin look. If you want a hint of shine on a tabletop for durability, go satin rather than full gloss. The difference is subtle in a swatch and obvious across a whole room.
Fix the legs and the proportions
Legs are the single most overlooked upgrade, and they change a piece more than paint does. Swapping stubby molded feet for tapered wood or hairpin legs raises the body off the floor, adds a shadow line underneath, and instantly reads mid-century instead of budget. Most home stores sell screw-on legs with mounting plates for a few dollars each.
Height matters too. A sofa or cabinet that sits too low to the ground feels heavy and cheap. Raising it even two inches lets light pass beneath it, which makes the whole piece look lighter and more deliberate. Check that any new leg can carry the weight, especially on anything you'll sit or load up.
While you're under there, level everything. A piece that rocks or sits crooked telegraphs "disposable" no matter how nice the finish is. Felt pads and a few minutes with a screwdriver fix most wobbles for free.
Proportion tricks work on the top of a piece too. Adding a thin slab of solid wood or a stone remnant over a flimsy laminate tabletop hides the worst surface on the whole piece and gives you a real material to touch. Stone yards often sell offcuts cheap, and a small marble remnant on a side table reads as a splurge it never was. The body underneath can stay exactly as it is.
Style it with texture and the right light
Once the piece itself is handled, the room around it sells the upgrade. Hard, flat surfaces look cheap; layered texture looks rich. A linen throw, a chunky knit, a leather tray, a stack of real books, and a single ceramic object do more for a $60 console than another coat of paint would.
Lighting is the quiet hero. Overhead builder fixtures flatten everything and wash out color. Add a warm lamp or two at eye level and the same furniture suddenly has depth and shadow. Aim for soft, warm bulbs in the 2700K range rather than the blue-white ones. The Department of Energy notes that LED bulbs now come in that full range of color temperatures, so you can get warm light without the old energy bill.
One last move: edit. Three considered objects on a dresser look expensive. Eleven random ones look like clutter, and clutter reads as cheap no matter what it's sitting on. Pull most of it off, leave the best pieces, and give them room to breathe.
Texture matters because expensive materials are rarely flat. Real wood, woven fabric, glazed ceramic, and brushed metal all catch light differently across their surface. Plastic and printed laminate stay uniform, which is part of why they read as cheap. When you set a nubby wool throw or a coil of natural rope near a budget piece, you borrow the richness of those materials. The eye reads the whole vignette as one expensive moment.
None of this requires a big budget or a contractor. A weekend, a screwdriver, a quart of low-VOC paint, and a set of decent pulls will carry most pieces a long way. Start with one item you already dislike, fix the loudest two tells, and you'll see how far a few small moves go before you ever think about replacing anything.